Setup for Windows
To install Rails for Windows we’ll need to install Ruby and several supporting tools such as Git and SQLite. Follow the steps below in order to install these tools on your computer. When you’re done with these steps you will have a Rails app running on your computer.
During these steps we’ll ask you to open and close the Windows Command Prompt every now and then. This can be either the “Command Prompt” or “Powershell” app. We ask you to close and re-open it, because when the Command Prompt starts it loads in the environment. When we install a new app, the environment does not get automatically updated in the Command Prompt. To test if the installation was successful we need to restart the Command Prompt and load the new environment.
If you run into any problems during this guide, check the Possible errors section for solutions.
Install Ruby
We’ll start by installing Ruby, the primary programming language used during the workshop. This can be done using the RubyInstaller described below.
- Download the RubyInstaller for Windows.
- Direct link to Ruby 3.4.7 installer with Devkit for 64-bit architecture.
- Run the installer. Click through the installer using all the default options.
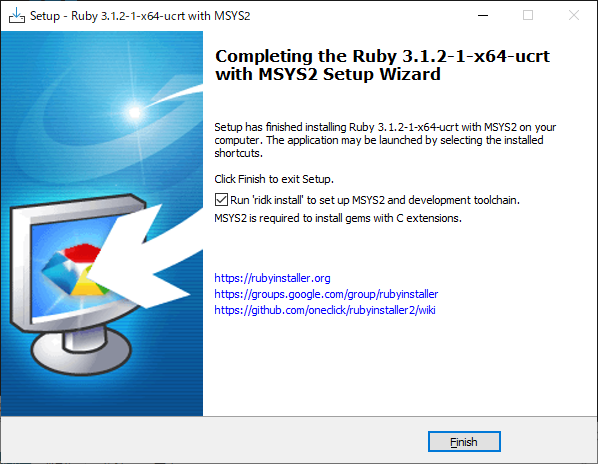
- Make sure the “Run ‘ridk install’” checkmark is checked partway through the installer before continuing.
- When prompted with the “MSYS2” installer, enter
1and press Enter. - When prompted with the same “MSYS2” installer again, only press Enter.
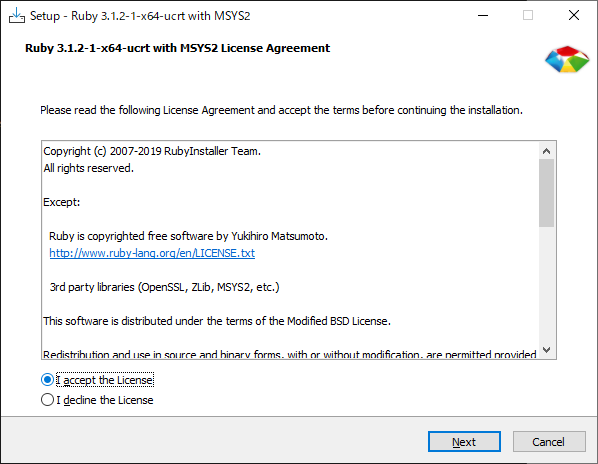
ライセンス認証画面が表示されます。
確認の上、同意いただけるなら、「I accept the License」をチェックし、’Next’ボタンをクリックします。
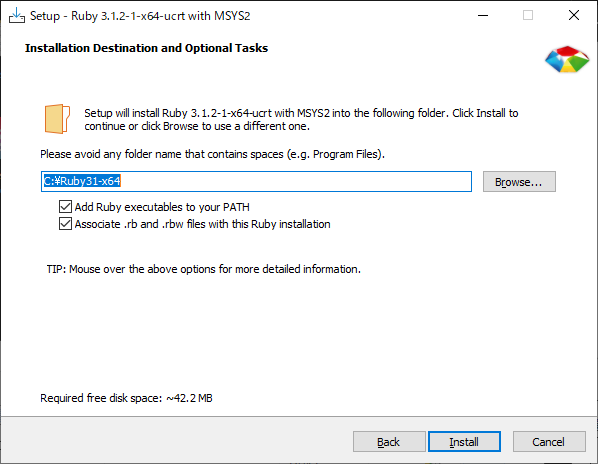
選択肢は全てデフォルトを選択し、’Install’ボタンをクリックします。
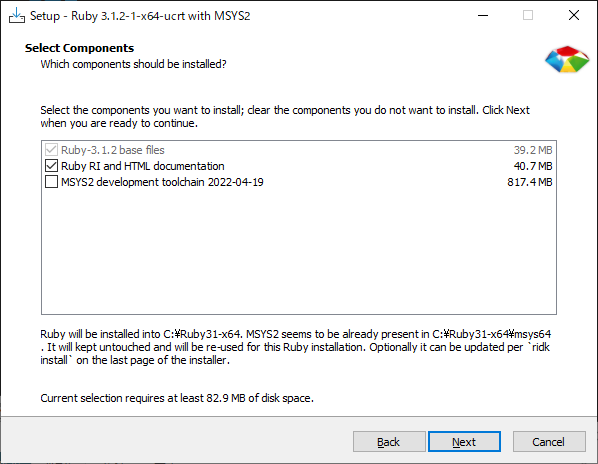
表示された画面で、選択肢は全てデフォルトを選択し、’Next’ボタンをクリックします。
Rubyのインストールが終了すると、以下の画面が表示されるので、’Finish’ボタンをクリックします。
コマンドプロンプトが立ち上がってMSYS2のインストールに進みますので 1 を選びます。
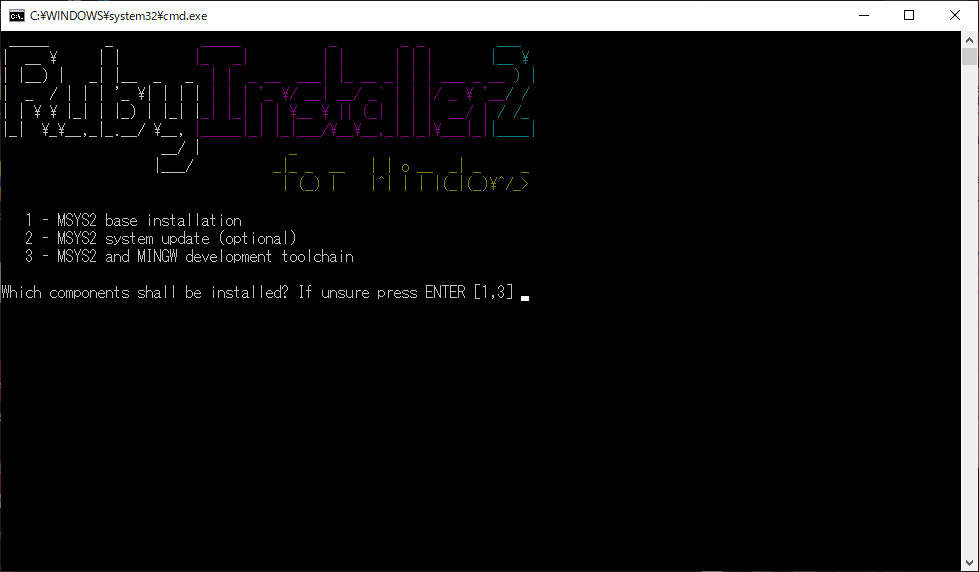
コマンドプロンプトが立ち上がってMSYS2のインストールに進みますのでデフォルトの選択肢(何も入力せずにエンター)を選びます。
MSYS2のインストール後、コマンドプロンプトが自動的に閉じるので、 Windowsスタートメニューからコマンドプロンプトを起動しておきましょう。
Install Git
You can now install Git, the version management system we’ll be using for this workshop. A version management system gives you a particularly handy superpower: it allows us to travel back and forth in time. Well, at least while working with files on our computer. We’ll show you how to use this during the workshop!
- Visit the Git installer for Windows download page.
- Click the link for the “32-bit Git for Windows Setup” installer to download it.
- Run the installer. Click through the installer using all the default options.
Install SQLite
Next you’ll install the SQLite database on your laptop. This is a system in which you can store data into and fetch data from. It does not have an automatic installer unfortunately, like Ruby and Git, so you’ll need to do a couple of more steps manually.
- Visit the SQLite download page.
- Scroll down to the “Precompiled Binaries for Windows” section.
- Download the
sqlite-dll-win32-x86-xxxxxxx.zippackage (wherexxxxxxxis the most recent version number). - Download the
sqlite-tools-win32-x86-xxxxxxx.zippackage (wherexxxxxxxis the most recent version number).
- Open the Downloads directory with Windows Explorer.
- Extract the packages by double clicking the files in the Downloads directory that match the files you downloaded. These will create new directories with similar names in your Downloads directory. Remember these.
- In Windows Explorer, open “This Computer” in the sidebar and open the
C:local disk.- Create a new directory called
sqlite3by clicking the right mouse button, “New” and “Folder”. Enter the namesqliteand press Enter.
- Create a new directory called
- Copy the files from the extracted packages in your Downloads directory, into the
C:\sqlite3directory. As a result you will have the following files in that directory:sqldiff,sqlite3.def,sqlite3.dll,sqlite3andsqlite3_analyzer. - Open the Windows Command Prompt and run the following command to add the
c:\sqlite3directory to the system PATH so you can access it in the Command Prompt app.- For Command Prompt users run the following command:
setx path "%path%;c:\sqlite3"
- For Powershell users run the following command:
setx path "c:\sqlite3"
- For Command Prompt users run the following command:
- Close the Windows Command Prompt app.
- Re-open the Windows Command Prompt.
- Run the following command to check if the installation was successful. It should output a version number like
3.41.1(your version may differ).
sqlite3 --version- Close the Windows Command Prompt app.
These were a bunch more steps than you’ll need to perform for these kinds of steps for the rest of the workshop. If you get stuck at any time, ask a coach or any of the organizers of your local workshop for help.
Install Rails
Finally, you’ve arrived at the part where you’ll install Rails, the tool you’ll focus on during the workshop.
Open the Windows Command Prompt run the following command. This will install the Rails and bundler gems on your computer.
gem install rails bundler --no-documentLet’s check whether Rails was installed successfully. Open the Windows Command Prompt and run the following command to check if the installation was successful.
rails --versionThis should output Rails 8.0.3, but a higher version is also good.
If you run into any problems during this step, check the Possible errors section for possible solutions.
Check the environment
Almost there! We’ve installed a chain of tools: Ruby, Git, SQLite and now finally: Rails. Let’s see if everything works as intended.
To test this, we’ll create a new app. Don’t expect too much, it will just show a single webpage showing the “Rails” logo. During the workshop you’ll turn that page into an actual app. For now, we just need to make sure that you can see that logo. Let’s get started with our final set of Terminal commands!
Check that everything is working by first running the application generator command. This will create a new Rails app which we can test with.
rails new railsgirlsappThe rails new command creates a new folder on your computer called “railsgirlsapp”, containing all the code for your application. Let’s open that directory in the Terminal using the cd command:
cd railsgirlsappNext, you’ll start the Rails server briefly to make sure it starts properly. This is where the magic happens.
rails serverUnlike previous commands, this one will not stop until you press the ctrl + c keys together to stop it. You have just started a web server on your laptop, and it is ready to start taking visitors and show them your sample application. Let’s not keep it waiting.
Go to http://localhost:3000 in your Browser. You should see the Rails logo appear.
If at any point during this guide you ran into a problem and can’t continue. Not a problem! Contact the workshop organizers and let them know about your problem. Some workshops have dedicated set up evenings and otherwise they can help you on the day of the workshop itself.
If you do see a Rails logo in your Browser, you now have a working Ruby on Rails programming setup. Congrats!
You’re ready for the workshop. If you are preparing before the workshop, you don’t have to continue with guides until the day of the workshop. See you then!
If there’s a coach present, they can help verify the installation by using the scaffold command and inputting data with the generated page with coaches to ensure everything is working. Remove the test app railsgirlsapp to make super sure no-one is working in the wrong folder, while following the steps of the workshop.
ガイドを進めていて行き詰まったときはコーチに助けてもらいましょう。また Ruby、Rails、コンソール、テキストエディタについての便利なチートシート も参考にしてみてください。
ガイド
- ガイド 1: はじめに
- ガイド 2: ツールについて知ろう
- ガイド 3: Rails Girls インストール・レシピ
- ガイド 4: はじめてのアプリを作る
- ガイド 5: HTMLとCSSを使ってアプリをスタイリングしよう
- ガイド 6: アプリに新しいページを追加しよう
- ガイド 7: 新しいホーム画面を追加しよう
- ガイド 8: 画像アップロード機能を追加しよう
- ガイド 9: GitHub であなたのアプリのコードを公開しよう
- ガイド 10: これらのサービスのどれかで あなたのアプリをインターネットに公開しよう
- ガイド 11: HTML と CSS を使ってアイデアのページをデザインしてみよう
- ガイド 12: コメント機能を追加しよう
- ガイド 13: 画像のサムネイルを作ってみよう
- ガイド 14: RSpecでアプリをテストしよう
